Assignment: Technical Blog | I Need Space!
In this post, we will explore a concept in CSS design. CSS stands for Cascading Style Sheets. This is a tool used by many web designers to turn a single column of plain text into the beautiful websites that you see all over the internet. There are many aspects of CSS one would have to understand in order to stylize a website, but I think it will be best if we take this one step at a time. For now, we will focus on one issue: spacing.
Margins, borders, and paddings can all serve as spacers between objects on a website. Let's back up for a moment and talk about what constitutes an object. An object is really anything on the site: an image, a text box, a heading, a button, a table, a data cell within a table, a section of color, etc. A web designer arranges the objects to create the site you see online. But how do can we determine how much space each object takes up? Obviously, each object has a size, but that's not where the story ends. We can also determine how much space the object needs around it, creating space between objects. This is where our margins, borders, and padding come in.
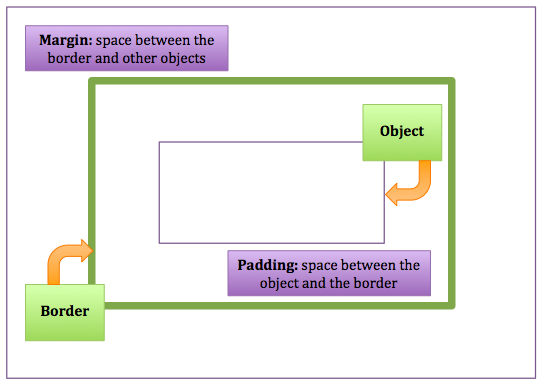
From the inside out, we go from the object itself out to the padding, then the border, and finally the margin. As state previously, an object has its own dimensions (width x height). The padding is the space between the object and its border. The border, which may be made visible by the web designer, surrounds the object. The margin is the space between the border and other objects on the site. Please see the diagram below for further clarification.
More on Margins
As discussed above, a margin is the space between an object's border and other objects on the site. We define the length of this space using CSS by typing:
margin: [length];margin: 40px):
Or we could use margin: 1px; and get something like this:
Unequal Margins
We can also choose different margins for the different sides of an object. Each side can be set using the commands margin-top, margin-right, margin-bottom, or margin-left, respectively. Or, we can indicate all four at once by typing margin and listing each margin length in the order listed above (starting with the top and moving clockwise around the object). For example, the code margin: 4px 3px 2px 1px; would produce a top margin of 4 pixels, a right margin of 3 pixels, a bottom margin of 2 pixels, and a left margin of 1 pixel. Below is an example of an object with unequal values for its margins on various sides:
are much larger than my
bottom or right ones.
Borders for Beginners
A border is exactly what it sounds like: it borders the object. We can define several attributes of a border such as its weight, style, and color. We can also determine whether or not it will be visible (the style "none" would render the border invisible). Our code for creating a border around an object looks like this:
border: [weight] [style] [color];border: 15px solid black; and border: 2px dashed red; for two objects, respectively:
Prepping Your Padding
Padding, like the margin, represents empty space. However, this space is between the object and its border. We set the padding using:
padding: [length];space between my
border and me.
I feel cramped!
too far away.
I feel lonely!
just right. I feel
like Goldilocks!
Unequal Borders and Padding
Just as with margins, we can apply our borders and padding unequally on different sides:
thick, some sides thin; some solid,
one dotted, one dashed...
Look at my uneven padding!
In case you're curious, here is the CSS code from our mismatched border example:
border-top: 7px dotted blue;border-right: 12px solid green;border-bottom: 10px dashed red;border-left: 3px solid yellow;And here is the CSS code from our unequal padding example:
padding: 50px 10px 0px 150px;Well, I hope this has given you some insight into the wonderful world of CSS design. I'm excited to be learning all of this, and I hope you are, too. Please check in on my blog as I continue my journey toward becoming a web developer. In the meantime, happy coding!